If you’re a juicing enthusiast, you know that a good juicer can make all the difference in the taste and quality of your final product. But even the best juicers need a little TLC from time to time, including cleaning the strainer. In this article, we’ll tell you why it’s important to keep your juicer strainer clean and give tips on how to do it effectively.
Why it’s important to clean your juicer strainer
If you’re a regular juicer, you know that a crucial part of the process is cleaning your juicer strainer. But why is it so important to keep this component clean? Here are four reasons:
1. To prevent buildup. Over time, bits of pulp and another residue can build up on the strainer, making it less effective at doing its job. Regular cleaning will help to prevent this buildup.
2. To improve flavor. If your strainer is caked with residue, it can affect the flavor of your juice. Keeping it clean will ensure your juice tastes fresh and delicious every time.
3. To prolong the life of your juicer. A dirty strainer can strain your juicer’s motor, potentially leading to premature wear and tear.
4. It helps to prevent clogs. If your strainer is full of pulp and debris, it’s more likely to get clogged up. It can lead to your juicer working less effectively or even breaking down entirely.
What you’ll need to clean your juicer strainer
When it comes to juicing, one of the essential parts of the process is cleaning your juicer strainer. Here’s what you’ll need to get the job done:
1. A small brush: This will help you get into your strainer’s nooks and crannies so that it’s properly cleaned.
2. White vinegar: Vinegar is a great natural cleaner and will help remove any built-up residue from your strainer.
3. Hot water: You’ll need hot water to rinse off your strainer after you’ve scrubbed it with the brush and vinegar.
4. A clean towel: This is for drying off your strainer once it’s been rinsed.
5. Dish Soap: This will help you get the best clean possible.
6. Lemon: This is optional, but it can help to remove any extra buildup on your juicer strainer.
May you like: Healthy liquids for smoothies
A step-by-step guide to cleaning your juicer strainer
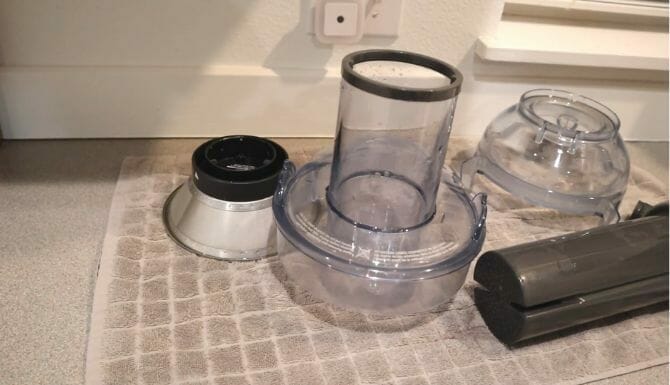
Step 1: Disassemble the juicer
If you’re looking to clean your juicer strainer, the first thing you need to do is disassemble the juicer. Here’s a guide on how to do just that:
1. Unplug the juicer from the power outlet and remove any attachments, such as the pulp collector or juice container.
2. Take off the juicer cover and then remove the strainer basket. Some juicers have a locking mechanism that needs to be released before you can remove the basket.
3. Carefully lift the juicer off its base and unscrew the pulp container lid.
Step 2: Take out the strainer
Next, please take off the strainer lid and set it aside. Now it’s time to remove the strainer itself. Be careful when doing this, so you don’t damage the juicer. Many people do not realize that a strainer inside the juicer needs to be removed. The strainer is under the blades, and it is vital to remove it before washing the juicer parts.
Best goes with: Can you sharpen juicer blades
Step 3: Soak the strainer in soapy water
After taking the strainer out of the juicer, it’s essential to soak it in warm & soapy water. It will help remove any remaining pulp and prevent it from hardening on the strainer. Soak the strainer in soapy water for at least 15 minutes before rinsing it clean.
Step 4: Brush away any pulp with a soft-bristled brush
After soaking your juicer strainer in warm, soapy water, brush away any clinging pulp. A soft-bristled brush is all you need to get the job done quickly and easily. If your strainer is particularly dirty, you may need to soak it for a few minutes before scrubbing. You can gently lift the pulp stuck to the strainer with a bristled brush. It will not require the use of your fingers.
Step 5: Use a toothbrush for deep-seated pulp
A toothbrush is not just for your teeth. A toothbrush is a perfect tool for cleaning hard-to-reach areas and removing residue. You can also use it for deep-seated pulp in your juicer strainer.
The bristles on a toothbrush are tough enough to break up any clumps of pulp that may be stuck in the strainer. A toothbrush handle is also the perfect size for getting into those hard-to-reach places in the strainer.
Step 6: Scrub the strainer with a non-abrasive sponge
After brushing the strainer of your juicer, it is vital also to scrub it with a non-abrasive sponge. It would be best if you used a non-abrasive sponge to scrub the strainer, which will help avoid scratching the surface. It will help remove any residual pulp or juice stuck to the strainer.
Step 7: Soak the strainer in a vinegar solution
Vinegar is a natural disinfectant and will help remove any residue that may be stuck on the strainer.
To make the vinegar solution, mix equal parts water and vinegar. Soak the strainer in the solution for at least 30 minutes or up to overnight.
Remember, rinse the strainer well with water and dry it before using it again. It’s a bonus step. You can do it if you want, but if you don’t, there is no problem.
You should know: Can you get drunk from apple juice
Step 8: Rinse the strainer with water
Now remove the strainer of the juicer from the vinegar. And rinse it with cold, clean water. It will help keep the juicer clean and free of buildup.
Step 9: Use a towel or sun heat to dry
After washing the stain thoroughly, you can place it on a towel or in the sun to dry it. It will help to remove any residual soap or detergent that may still be present in the fabric. It is vital to ensure that the stain is completely dry before attempting to treat it with any other products.
Please leave it to dry in the sun’s heat for 30 minutes.
Step 10: Reassemble the juicer
After you have cleaned and dried the juicer strainer, it is time to reassemble it. If you need help, refer to the user manual.
To reassemble the juicer, locate all the parts of the juicer that you had taken apart for cleaning. First, align the tabs on the filter with the slots on the juicer. Ensure the rubber gasket is in place and no missing or damaged parts. Then, push the filter into place until it clicks. Once the filter is in place, you can put the cover back on and screw it.

Conclusion
A juicer is an excellent addition to any kitchen, and regular cleaning of the juicer will extend its life. A juicer strainer is one of the essential parts of the juicing process. If you don’t clean it properly, you can end up with much pulp in your juice. If you’re unsure how to clean your juicer strainer, don’t worry – we’ve got you covered. Above is a step-by-step guide on effectively and efficiently cleaning your juicer strainer.
